
JM Weston sizing is a bit special, especially with their iconic loafers.
If you’ve been reading about their famous 180s or any of their other slip-ons, you’ve probably already heard the fit is… particular, if not weird.
And you’d be right.
Their loafers come in multiple widths, the leather takes time to break in, and if you don’t nail the fit, you won’t get that elegant silhouette JM Weston is known for.
I’ve pulled together everything you need to know to help you make sense of how JM Weston loafers really fit, what to expect when you first wear them, and how to pick the right size, whether you’re coming from sneakers, dress shoes, or boots.
Plus, we’ve got the official JM Weston size chart (but trust me, the chart doesn’t tell the whole story).
Let’s dive in…
JM Weston Sizing
JM Weston loafers look kind of bulky when you see them online or in a shop. But once you put them on, they don’t feel or look oversized at all.
In fact, they give off a clean, elegant silhouette, as long as you get the size right.
Let’s start with the basics…
JM Weston uses UK sizing, not US. But their conversion can be a little off.
Most brands go with the standard: UK is one full size down from US. But Weston treat UK sizing as only half a size down from US.
That means their marked “US size” might not line up with what you’re used to. Just ignore the US size they list and go with the UK size directly. It’s what’s stamped on the shoes anyway, no matter where you buy them.
Size Varies by Model
View this post on Instagram
Yeah, this part can be a headache: you won’t wear the same size across all Weston models. For example:
- In the 180 Loafer, you might need a full size down from your usual UK size.
- In the 598 Demi-Chasse, you could be true to size.
- In the Golf or Chasse models, you might even need to size up half a size or go with a wider width.
So no, you can’t just figure out your JM Weston size once and use it across the board. Every last fits differently, and you’ve got to treat each one like its own thing.
More on the 180 Loafer…
The 180 loafer Runs Big, but not in the way you’d expect.
Most folks go down a full size from their true Brannock. But there’s more to it than that. These loafers come in multiple widths, and the toe box is a bit roomy. So even though they’re snug in the heel (which we’ll get to), they won’t crush your toes.
Here’s what I think:
If your true size already feels snug but wearable, stick with it. The leather will stretch and mold around your foot, giving you that glove-like fit loafers should have.
But if you size down too far, yeah, it’ll feel good at first. Then the leather breaks in… and suddenly they’re too loose. Not great for a loafer with no laces to keep your foot in place.
41 Last
The iconic 180 loafer is built on the Last 41, which was designed in the mid-1940s and is still used today. This last has a rounded, chunky, high-wall apron, making it fuller and more structured than many dress shoes, which gives structure and room in the toe box.
Now, high-wall aprons (like on Last 41) mean the shoe holds your foot higher on the vamp, so expect a snugger foot hold and structured shape.
Now, if you’re curious how this compares to another brand with a ton of different lasts, check out my guide to Crockett and Jones sizing. It breaks down their fits model by model.
That Heel Break-In Struggle
You won’t believe this, but the heel can feel almost too loose at first and too snug at the same time. Sounds weird, right?
Well, JM Weston uses leather lining in the heel, while other brands like Alden or Crockett & Jones often use suede. Suede grips better than leather right out of the box.
So don’t panic if your heel slips a bit in the beginning. The leather will break in, gain grip, and mold to your foot over time.
Now, have you ever worn a shoe that fit perfectly everywhere, except the heel slipped a little at first? Did it improve over time?
Widths: The Real Advantage
View this post on Instagram
This is where JM Weston shines. They offer a wide range of widths, which most brands just don’t. That means you can adjust your fit way more precisely as long as you know your foot’s shape.
For example, someone with high arches and volume through the midfoot might feel great in a D width, even if they usually wear an E in other brands.
But someone with flatter, wider feet may need to bump up the width just to avoid pressure points.
What About Their Online Sizing Tool?
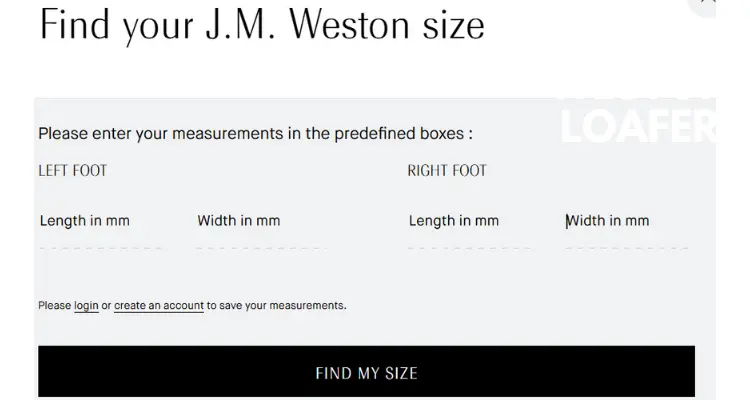
It’s helpful, but it’s not perfect. One Weston associate even said it doesn’t measure volume, which makes a huge difference in loafers. So if you have high arches or an unusual foot shape, the tool might point you in the wrong direction.
Still, Weston does offer phone consultations and will ship you sizes to try at home if you follow their foot measurement guide. Not a bad option if you’re not near a store.
Quick Comparison (Just for Reference)
Let’s say you’re a US 11D Brannock:
- In the JM Weston 180, you might end up with a 9.5D UK
- In the Golf 641, a 10D UK
- In the Chasse 677, a 10.5D UK
- In the 598 Wingtip, maybe a 10.5E UK
Compared to other brands:
- Alden Barrie/Trubalance: 10.5E US
- Grant Stone Leo: 10.5E US
- Edward Green 64 last: 10 UK F
- Carmina: 10 UK (but might need a wider last)
- Viberg: 10 US, sometimes 10.5 on narrow lasts
- RM Williams Gardener: 10H UK
- Vass 3636: EU 44
Related:
If you’re curious how brands with a totally different design philosophy tackle fit, check out how Jim Green boots fit, especially their barefoot models. It’s a whole different world from Weston, but just as precise.
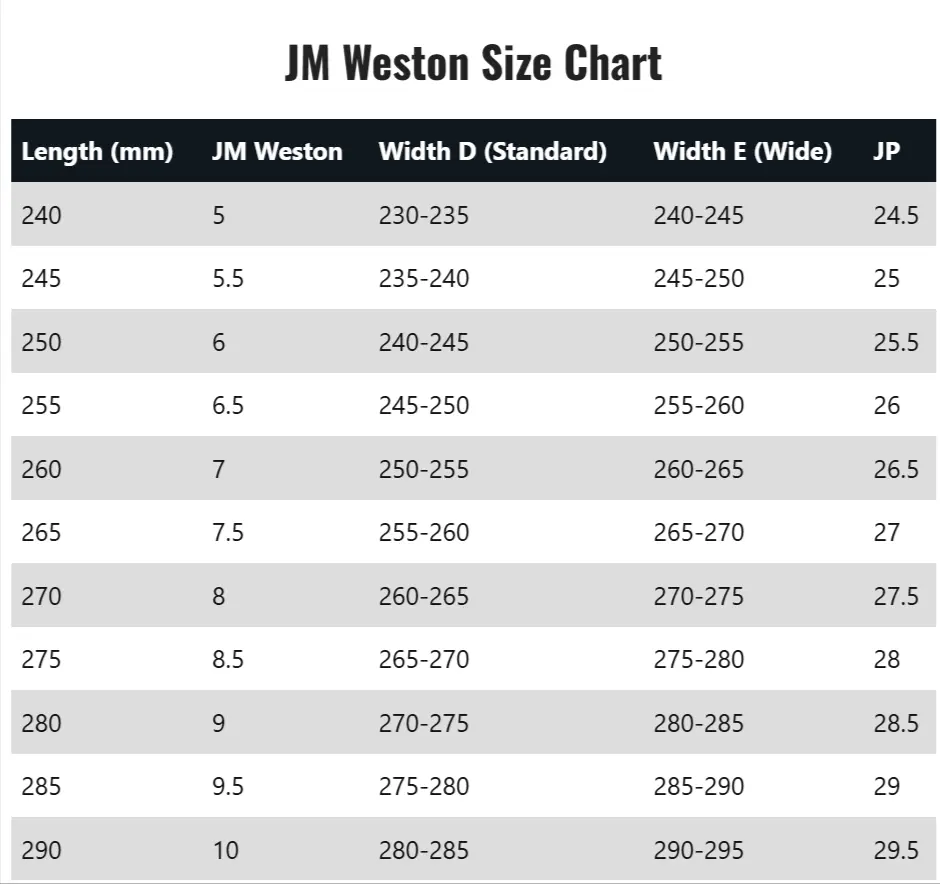
JM Weston Size Chart
| Length (mm) | JM Weston | Width D (Standard) | Width E (Wide) | JP |
|---|---|---|---|---|
| 240 | 5 | 230-235 | 240-245 | 24.5 |
| 245 | 5.5 | 235-240 | 245-250 | 25 |
| 250 | 6 | 240-245 | 250-255 | 25.5 |
| 255 | 6.5 | 245-250 | 255-260 | 26 |
| 260 | 7 | 250-255 | 260-265 | 26.5 |
| 265 | 7.5 | 255-260 | 265-270 | 27 |
| 270 | 8 | 260-265 | 270-275 | 27.5 |
| 275 | 8.5 | 265-270 | 275-280 | 28 |
| 280 | 9 | 270-275 | 280-285 | 28.5 |
| 285 | 9.5 | 275-280 | 285-290 | 29 |
| 290 | 10 | 280-285 | 290-295 | 29.5 |
Related:
For a different fit feel, check out our guide on how Astorflex shoes fit. Their shoes are softer and more relaxed compared to JM Weston’s structured, formal build.
So, What Makes French Loafers… French?
French loafers don’t really fit into the usual categories. They’re not super dressy like the sleek stuff from Edward Green. And they’re not laid-back and moccasin-inspired like the classic American styles from Rancourt or GH Bass.
They fall somewhere in the middle, what I’d call “in-between loafers.”
Take Alden loafers, for example. They’re not sharp like dress shoes, but they’re not weekend-casual either. French loafers live in that same gray zone. But they’ve got their own unique character that sets them apart.
Bulkier, Boxier, and Proudly So
The first thing you’ll notice is that French loafers look bulkier than their English cousins. They’re wider, boxier, and they’ve got more volume overall.
Honestly, it feels intentional, like a quiet rebellion against American sleekness and English refinement. The French clearly want to do things their own way.
And it works.
The Strap
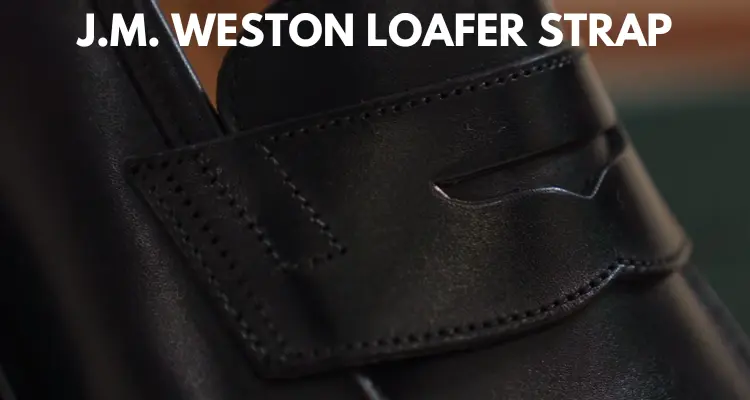
One of the easiest ways to spot a French loafer is the strap. It’s thicker than what you’ll find on most other loafers. And then there’s that seagull-shaped cutout, which is a little swoop in the middle of the strap that adds some personality.
You’ll see it on JM Weston loafers for sure, but also on models from Crockett & Jones, Beckett Simonon, and Berwick when they’re trying to nail that French look.
Curious how Beckett Simonon fits? Here’s my full Beckett Simonon sizing guide if you want to compare.
Raised Vamp = More Structure
The apron or vamp on a French loafer isn’t just stitched flat. It’s actually raised, with a defined edge you can see and feel. This is different from the American or English approach, where the raised look is usually just created by stitching detail on a single piece of leather.
That raised vamp gives the shoe more structure and more attitude.
A French Icon Born in… Massachusetts?
You might not expect it, but J.M. Weston actually has roots in the U.S. (well, sort of.)
The founder’s son, Eugène Blanchard, studied shoemaking in Weston, Massachusetts, where he learned Goodyear welt construction.
He eventually brought that knowledge back home to France and opened a workshop. The name is a nod to where it all started: J.M. Weston.
But what really put the brand on the map wasn’t just craftsmanship. It was the loafers. The iconic 180 penny loafer, in particular, turned heads.
And not because it copied English or American styles. It had this bold, boxy, unmistakably French silhouette that stood apart from anything else out there.
I think that’s part of what made Weston special from the beginning. They didn’t try to fit into the mold. Instead, they made loafers that looked and felt… French. The raised vamp, the chunkier shape, the seagull strap, there’s just nothing else like it.
Style Meets Fit: What You Should Know About Key Models
Let’s shift gears a little and talk about a few other Weston models you might be considering and how they fit into different style vibes.
The Golf Derby
Think of this as Weston’s rugged cousin. It’s wider, a bit bulkier, and honestly leans more casual than dressy. If you like a refined-but-outdoorsy look (kind of like “heritage menswear” before it became a hashtag), this one’s a solid pick.
The Split Toe (Chasse)
You won’t believe this, but Weston actually includes toe plates on some of their split-toe models. That’s not common, and it makes a huge difference if you’re walking a lot or care about long-term wear.
The split-toe style walks the line between rugged and sharp. You can dress it up, but it still has that chunkier French edge.
The 180 Penny Loafer
This is the one that made the brand. You’ve seen it. Maybe you’ve even lusted after it online. It’s structured, iconic, and walks that “in-between” line we talked about earlier.
But here’s a heads-up: if you’re not into leather soles (they can be slippery at first), you might want to get a rubber half-sole added. A lot of people do it. It makes the loafers less slide-y and way more durable for everyday wear.
How to Measure Your Feet for JM Weston
I’m going to walk you through everything, step-by-step. Whether you’re shopping in a fancy store with pros, or chilling at home with zero tools, I’ve got you covered.
In-Store Measurement: Why Pros Make a Difference
If you’re lucky enough to have a Weston boutique nearby, I strongly recommend visiting.
Here’s why:

They measure with experience: Weston staff are trained in fitting their unique lasts. They understand how the shoes break in, which sizes and widths work best for different foot shapes, and how to avoid those common slip-ups.
Try on multiple sizes and widths: Weston offers many widths per size. A pro can help you test several pairs quickly, noticing subtle differences you might miss.
They check for volume, not just length: Volume is how much space your foot needs inside the shoe, taking into account width, instep height, and arch shape.
This is crucial for Weston loafers, which come in various widths but also need the right volume to avoid pinching or slipping.
Pro tip: Go late afternoon or evening if you can. Feet swell a bit as the day goes on, so measuring when your feet are their largest means you won’t end up with shoes that feel tight after a few hours.
Measuring at Home with a Brannock Device

If you have access to a Brannock device, this is a solid way to start.

Measure both feet: One foot is almost always bigger. Use the measurements of your larger foot.
Length: Place your heel firmly against the back of the Brannock device and measure the longest toe to heel.
Width: The device measures width based on the widest part of your foot. JM Weston uses width letters (D, E, F, etc.), so the Brannock width measurement is directly useful.
Instep height/volume: The Brannock doesn’t measure this, which is important for Weston shoes because volume affects fit.
Important: Weston sizing is UK-based, but the Brannock device uses US sizing.
Measuring at Home Without a Brannock Device
Here’s how to get good measurements with just a ruler, paper, and pen.

What you’ll need:
- A blank sheet of paper (bigger than your foot)
- A pencil or pen
- A ruler or tape measure
- Socks you’d wear with the loafers (optional, but helps)
Step 1: Trace your foot
- Place the paper on a flat, hard floor (no carpets).
- Put on the socks you plan to wear with the loafers.
- Stand with your full weight on the foot you’re measuring (weight-bearing is important).
- Carefully trace around your foot with the pencil held straight up. Don’t angle the pencil under your foot or outwards.
Step 2: Measure length
- Mark the longest point (usually the big toe or second toe) and the back of your heel.
- Use the ruler to measure the distance between those two points in millimeters or inches.
- This is your foot length.
Step 3: Measure width
- Find the widest part of your foot outline (usually the ball of your foot).
- Measure the distance across this point.
Step 4: Note arch height and instep volume
- This is trickier without a tool, but here’s a quick way:
- Press your thumb firmly into the top of your foot where it arches.
- How much space is between the bottom of your foot and your thumb? More space means higher instep.
- If you feel a tight curve or not much space, your instep is low.
Every Tip You Could Want About Measuring and Sizing JM Weston
Measure at the end of the day: Feet swell after hours on them. Measure late afternoon or evening for your most realistic size.
Measure both feet: One foot is usually bigger. Always size for the larger one.
Volume beats length: A foot can be the same length as another, but feel completely different because of width or instep height.
Width options matter: JM Weston offers D, E, F, and sometimes G widths. Don’t just pick your usual width from sneakers or other shoes.
Break-in is real: Even with perfect measurements, expect a break-in period. The leather stretches and molds, but the shoe shouldn’t feel too loose or tight initially.
Heel grip will improve: The leather lining in the heel feels slippery at first but gains grip after breaking in.
Don’t trust online size converters blindly: Weston uses UK sizing but converts it inconsistently for US markets. Always cross-check.
Ordering multiple sizes can be worth it: If buying online, consider ordering two sizes or widths to compare at home.
Use Weston’s sizing tool cautiously: It’s a good starting point but doesn’t measure volume. Call the store for sizing advice if unsure.
Sock thickness affects fit: Try measuring with the same sock thickness you plan to wear with the loafers.
Use your current best-fitting shoes as a reference: Compare their size, width, and fit with what you measure at home.
Quick Recap: Your Measurement Checklist for JM Weston
- Measure at the end of the day, standing fully on your foot
- Measure both feet and focus on the bigger one
- Measure length and width carefully (with Brannock or paper tracing)
- Check your instep volume and arch height by feel
- Compare to JM Weston sizing charts, remembering UK sizing quirks
- Consider different widths, not just length
- Factor in break-in and leather stretch
- Use professional fitting when possible, or order multiple sizes to try at home
Final Thoughts:
You know, after all this talk about JM Weston sizing, widths, lasts, leather stretch, heel grip, and seagull-shaped straps… I realized something: JM Weston isn’t just about the loafers. It’s about the process of figuring them out.
It’s kind of like learning a new language. At first, everything feels off. You question yourself. You might get the wrong size. You might hate the break-in period. But then it clicks. The leather molds. The heel grips. The fit becomes yours.
And suddenly, you’re walking differently. Straighter, maybe. Definitely more aware of the fact that you’re wearing something precise; something French, sure, but also something you earned through patience and trial.
Most shoes don’t ask this much of you. Sneakers forgive. Weston loafers test you.
But if you make it through that first awkward phase, you’ll get one that feels like it was made for your foot.
Drop a comment and tell me how they fit you. Did you size down? Go wider? Struggle with the break-in? I’d love to hear what worked (or didn’t) for you, especially if you’ve cracked the code on a tricky model.